


Build your own cyclone separator
All DIY‐ers know the problem of clogged vacuum filters or overflowing vacuum bags in the workshop vacuum cleaner.Just when you are about to give the final touches to your job, the vacuum begins to fail.
A remedy to this problem could be a pre‐filter that not only filters coarse dirt, but also a large part of the fine dust and routes the „dirt“ into a separate container. There is less load on the vacuum filter and the vacuum bags thanks to this prefiltering. We are talking here of what is called a cyclone separator. We will show you, how you can make your own cyclone separator, that will help you not only save money and but will also spare you some stress …
Cyclone separator principle
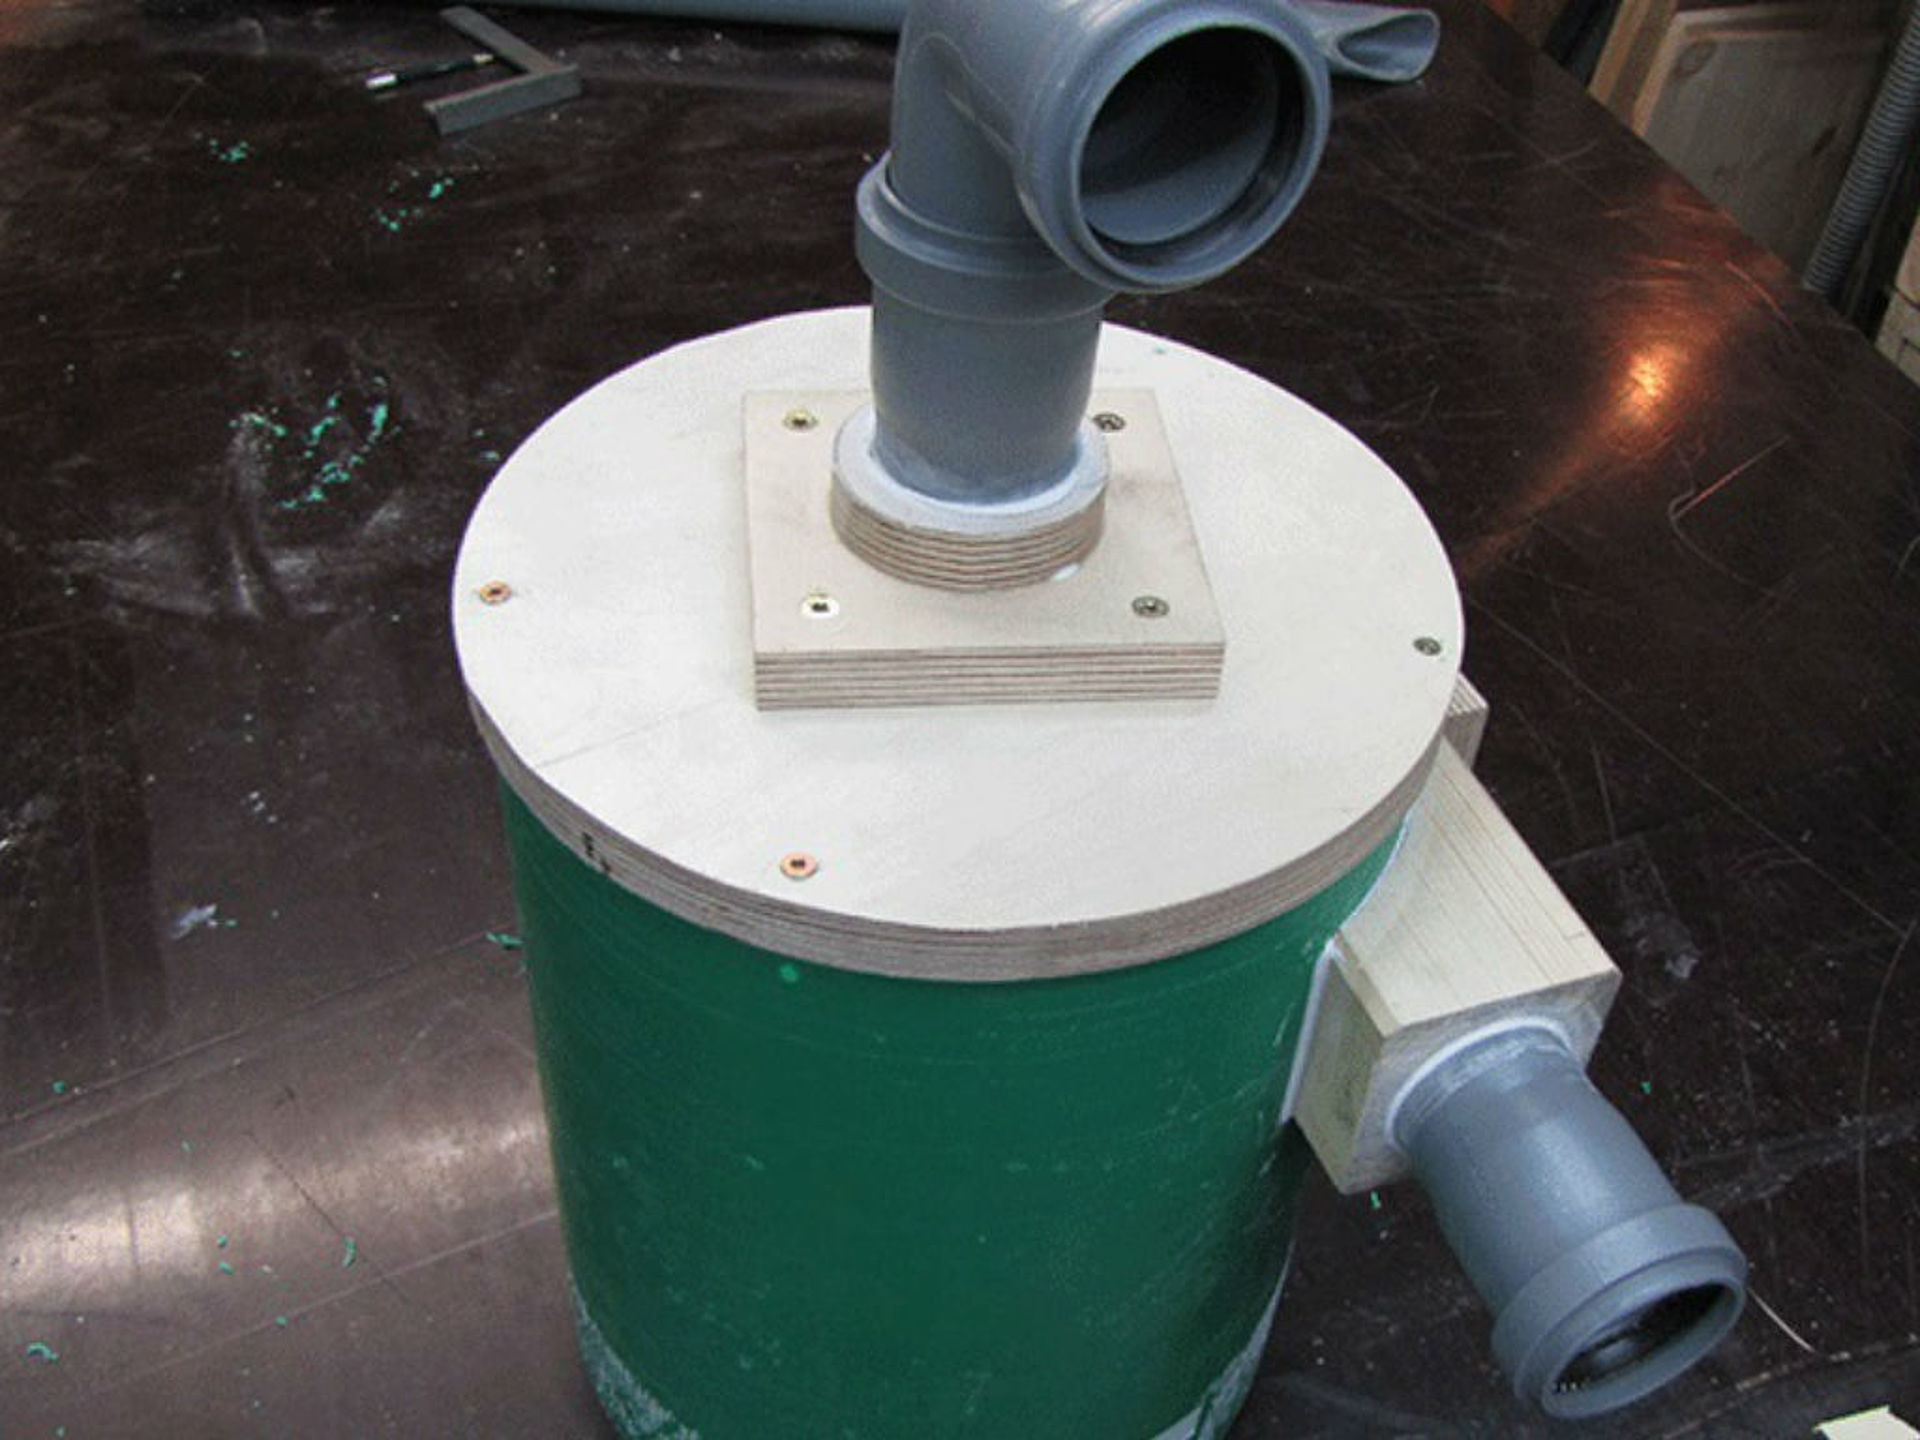
Before actually beginning to build one, we would like to give you a brief overview of the principle on which the cyclone separator works. The cyclone separator is a somewhat large upright pipe, which has a connection on the side for the suction hose and a connection for the vacuum cleaner, through a lid on the top. Under the separator, there is a container that is connected to the pipe, into which the dirt falls.
The vacuum cleaner creates a low pressure in this structure, which creates a counter balance through the vacuum cleaner outlet. The chips get sucked in and fall in the pipe, Because the connection is on the side, the chips hit against the wall of the pipe and are slowed down. They fall into the container due to gravity and are not captured by the suction hose above. Simple and very effective!
Material list
- 18 mm multiplex birch wood
- a plastic drum or glue wood, OSB or plywood panels for a collecting container
- water outlet pipe 250 mm diameter around 300 mm length
- PVC pipe 50 mm diameter
- PVC angled tube 50 mm diameter
- 1 piece wooden beam around 70x70 mm and 140 mm long
- Assembly adhesive
- Wood glue
- Screws
Tool list
- cordless drill
- router (optional, but ideal)
- cordless jig saw or band saw
- multitool or hand‐/ hacksaw
- drill hole (51 mm)
- bench drill (optional)
- ruler and angle (geometry set square will also work)
- pencil
- folding rule
Structure of cyclone separator
The body
You can cut the 250 pipe to the right length using the jig saw, or like I did, with the table circular saw and sliding table.
You can also get such a pipe in a construction materials shop or a civil engineering firm, which have such small pieces lying around as sections.

The lid
A router is best suited to make the lid. You will need a simple template and the copy sleeve of your router. You can use this to first cut a circular groove that is the wall thickness of the pipe and properly cut the lid one centimetre from the edge of the groove.
For the groove, I set the router depth to approx. 10 mm and it took me three passes to shape it.

The template
For the template, you will just need an approx. 1 centimetre thick small board. On one side, drill a hole whose size is the outer diameter of the copy sleeve. If you do not have a suitable drill bit, take the largest drill bit you have and enlarge the hole with a round file. Now measure from the outer margin of your groove the radius of the circle that has to be shaped and drive through a nail. The nail is now the centre of the circle.
The advantage of this type of template is that you can turn the router within the hole. In this way you avoid the clutter of cables and tubes.

If you do not have a router, you can first cut a round lid that is one centimeter larger than the diameter of the pipe. Then cut another lid, which corresponds to the inner diameter of the pipe and glue both the lids together.
The suction hose
For the suction hose, use the hole saw to make a suitable hole in the middle of the lid for the PVC pipe.
To fasten the suction hose, you must glue one or two reinforcement rings. Make another hole in a multiplex piece and then place a ring some 20 mm around the hole. You can do this with the band saw but a jig saw will also work very well. I have, in addition to this, made a 50 mm hole on a square board, glued on a ring and drilled 5 mm holes for screws. The suction hose should go approx. 200 mm into the body. At the end of the pipe a wooden plate with 200 mm diameter is screwed. To screw the plate at the end of the pipe, you can take one of the sawed pieces from the hole saw and glue it along with a wooden dowel in the middle of the wooden panel.
The section should pass through the suction hose tightly, if required, mill it properly. You must beforehand also cut the suction slot in the pipe. For this, cut a 100 mm long slot in the middle of the pipe. The width of the slot should be a little over a third of the pipe’s circumference.
The pipe is stable enough to hold the plate and in spite of that there is still enough air coming through. We will first put aside the finished pieces.


The hose connection
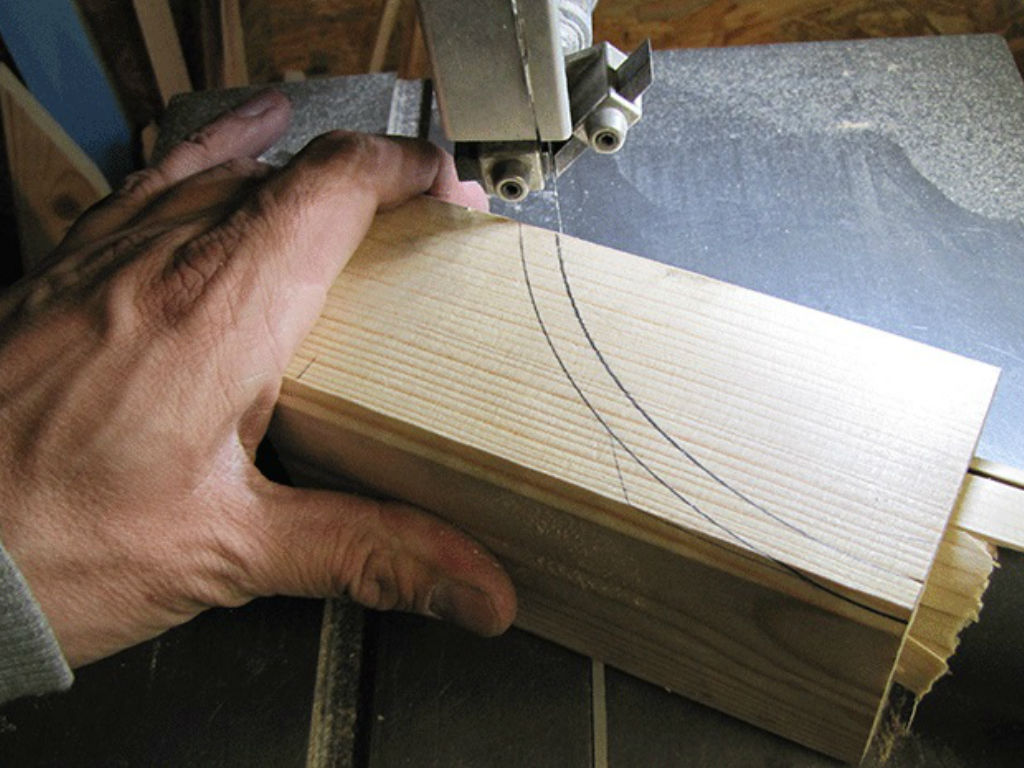
Let’s start with the slightly more complicated part: the connection for the vacuum cleaner hose. This must be exactly tangential to the inner wall of the body, so that the vacuumed material is guided along the wall. Any unevenness leads to turbulence, which can then be absorbed via the vacuum cleaner directly through the intake manifold. To do this we take our section of the 70 wooden beam and drill a centring hole with a 6 mm drill from both ends. Now we saw the hole for the pipe with the hole saw or a suitable Forstner drill. The piece of wood should later sit flush with the body. For this we have to mark the outer radius for the wood and the inner radius for the connecting pipe.
Now put the suction pipe for the vacuum cleaner connection and fix it on both sides with thin wooden wedges, so that it does not shift during the subsequent sawing. Saw off the rounding for the inner radius with a band saw or a jigsaw. Then pull the pipe out of the wood and saw along the marking for the outer radius. To transfer the opening to the body, you can apply a piece of paper to the curve of the block of wood and use a pencil to take on the inner contour. So that the paper does not always slip, the use of spray adhesive, which you spray onto the paper and allow to dry briefly, is recommended. Use a sharp knife to cut out the inner contour and transfer it to the body. Now drill a hole and saw out the opening with the jigsaw.

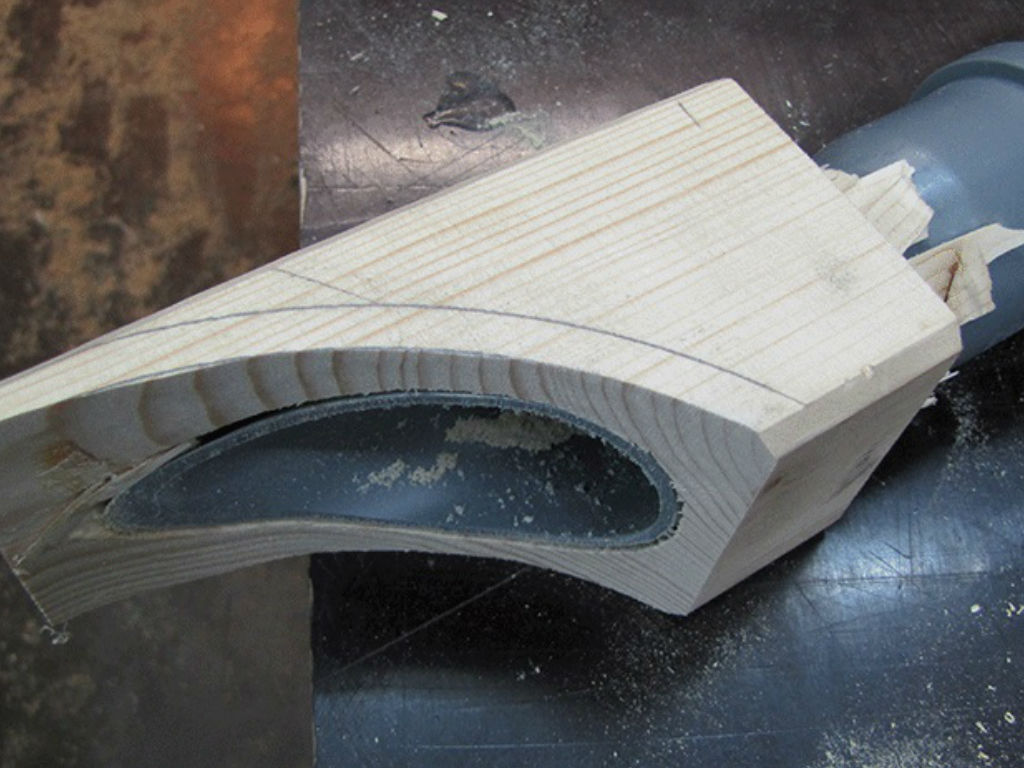
For the final details, it is best to work with a file and sandpaper. Now you can secure the piece of wood with assembly adhesive and screws inserted from the inside. You also insert the tube into the piece of wood using plenty of mounting glue. Make sure it is flush with the body and work with sandpaper if necessary. Everything has to be completely sealed later.
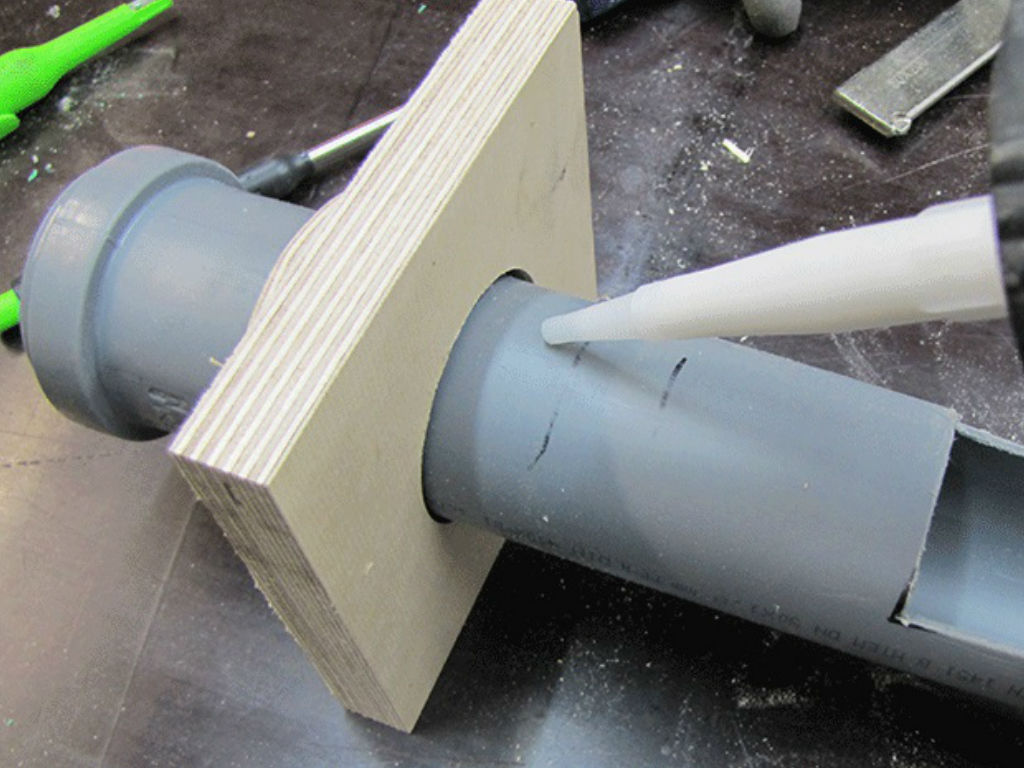
When the mounting glue is dry, you can put all parts of the cover together. First glue the suction tube and the reinforcing rings together. Make sure everything is angled.
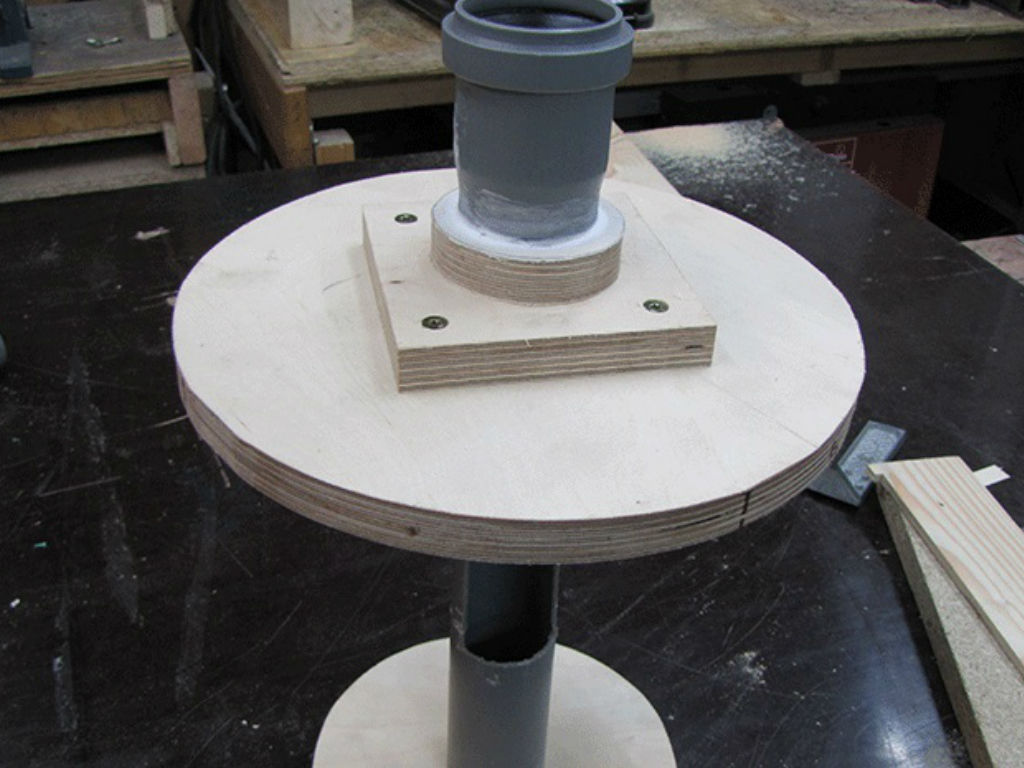
Once everything is secure, insert the suction pipe into the hole from the cover and screw the plate into it with four screws. Then attach the lower wooden plate to the intake pipe with two screws.
Now you can put the whole construction into the pipe, i. e. the body and fasten from the top with four screws. As the pipe has a wall thickness of approx. 10 mm this does not pose a problem.
The collection vessel
A good option is a 60‐litre plastic clamping ring drum. The disadvantage of such a vessel is the fact that it contracts rather quickly in the generated negative pressure. A rigid vessel is therefore a better option. I have just made myself a wooden box for this purpose, where I can open a door and insert a refuse sack.
The wooden box must of course also be sealed. To ensure this, I have provided wooden slats inside as a stop for the door, which I have stuck with sealing tape.

A hole corresponding to the inner diameter of the body is cut in the upper cover of the box with the jigsaw. The chips should later be able to fall through the hole unhindered. You can also use the router again here. To achieve a bit more stability, I have provided a plate at the top and bottom from the leftover wooden box with a corresponding hole. The hole in the bottom plate corresponds to the inner diameter of the tube and thus serves as a support.
The refuse sack is later hung in a ring and inserted between two strips. I glued the strips on the inside and pinned them with a compressed air pistol.
The ring for the refuse sack can be bent out of thick wire; that’s stable enough.
Completion
Finally, the tube comes on the cover and is glued with assembly adhesive. Pay attention to where the connections point so that you do not have problems with the hoses later. Incidentally, I’ve screwed four rolls under my collection vessel, so I’m flexible.
Your cyclone separator is now ready to use! The vacuum cleaner is connected at the top and the suction hose at the front.
If your construction does not have enough suction power, you should seal the inner edges of the collection vessel with silicone. After the „air leaks“ are eliminated, the extraction system works really well!
In this article you will learn all about:

Published on 20.02.2018
Whether it's drilling, hammering, or sanding, our professionals in the workshop and DIY field will show you how it's done. Frank Rath is a freelance blogger and a passionate craftsman. With his tips and tricks about Einhell tools, you will not only become an absolute DIY expert but also learn how to safely use each device.